Springboot整合Redis最簡單例子分享
1. 編寫目的
最簡單的例子,Springboot整合Redis。
2. 詳細過程
pom 文件添加依賴
<!-- https://mvnrepository.com/artifact/org.springframework.boot/spring-boot-starter-data-redis --> <dependency> <groupId>org.springframework.boot</groupId> <artifactId>spring-boot-starter-data-redis</artifactId> </dependency>
配置redis
編輯application.yml文件。
spring:redis:port: 6379host: 39.106.198.74### 如果有密碼需要添加password
編寫一個controller類
package cn.smileyan.shirodemo.controller;import org.springframework.beans.factory.annotation.Autowired;import org.springframework.data.redis.core.StringRedisTemplate;import org.springframework.web.bind.annotation.RequestMapping;import org.springframework.web.bind.annotation.RestController;@RestControllerpublic class RedisController { @Autowired private StringRedisTemplate stringRedisTemplate; @RequestMapping('/') private String hello() { stringRedisTemplate.opsForValue().set('hello','world'); return 'SUCCESS'; }}
測試
運行項目,然后用瀏覽器打開localhost:8080/這個地址。
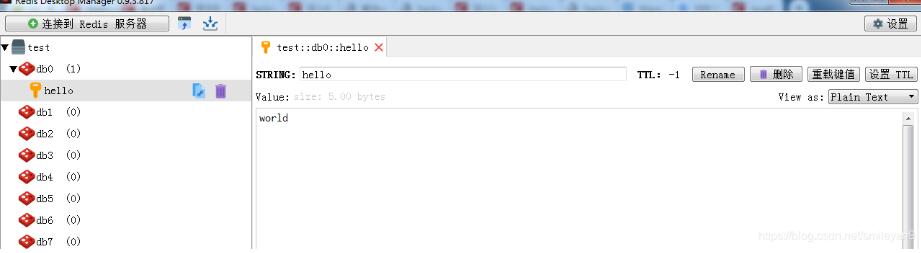
看到瀏覽器輸出SUCCESS后,使用Redis Desktop查看是否set成功。
3. 總結(jié)
非常簡單的例子,但還是記錄一下,在這個基礎(chǔ)上可以做很多事情,但是對于剛剛接觸的人來說,可能還是有用的。
以上這篇Springboot整合Redis最簡單例子分享就是小編分享給大家的全部內(nèi)容了,希望能給大家一個參考,也希望大家多多支持好吧啦網(wǎng)。
相關(guān)文章:
1. CentOS郵箱服務(wù)器搭建系列——SMTP服務(wù)器的構(gòu)建( Postfix )2. PHP基礎(chǔ)之生成器4——比較生成器和迭代器對象3. ASP新手必備的基礎(chǔ)知識4. Docker 啟動Redis 并設(shè)置密碼的操作5. asp文件用什么軟件編輯6. 通過IEAD+Maven快速搭建SSM項目的過程(Spring + Spring MVC + Mybatis)7. JS中6個對象數(shù)組去重的方法8. vue+element開發(fā)一個谷歌插件的全過程9. 利用CSS制作3D動畫10. Vue axios獲取token臨時令牌封裝案例

 網(wǎng)公網(wǎng)安備